
Men's shirts are different – shirt with slit without zipper and with zipper, with cuffs on the sleeves and without them, with a turndown collar and stand. The patterns performed on the collar, chest and bottom of sleeves. The proposed option consists of the front, back, sleeves, collar. For the construction of the pattern size 48 it is necessary to make such measurements: product length (DI) – 70 cm; the floor chest girth (TDG) – 48 cm; the floor neck circumference (NSE) – 19 cm; sleeve length (DR) – 60 cm product Length: for the foundations of the shirt, draw a right angle with the point at the top.From the point C down aside the length of the product (70 cm) and mark point D.

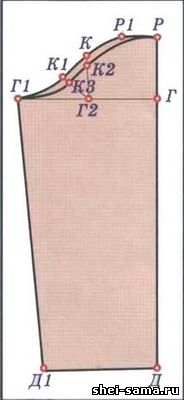
The Back
Neckline: how to draw the neckline of the shirt, it is necessary from the point C down to postpone a distance equal to the third part of the OHP plus 8 cm and place the point of G (i.e., SG=48:3+8=24). From points C and D to the right, draw a horizontal line. Then from the point G to the right set aside 1/3 of TDG plus 7 cm, point G1:ГГ1=48:3+7=23 cm From point G1 swipe perpendicular and at the intersection with the straight line at the point C1. Then from the point G1 to the right put plus 4 running cm, mark point G2: Г1Г2=48:4=16 cm From point G2 swipe perpendicular.The width of the openings (Г1Г2) split in half: Г1Г2=16:2=8 cm, point G3, from this point drop a perpendicular on the line crossing the bottom put a dot D1.
Rostock: from the point C to the right put 1/3 posh plus 1 cm and place the point L: CL=19:3+1=7, see to determine the height of Rostock, aside from point C1 up to 3 cm and place the point L1, the bisector of the angle 2 cm, the point P, then the points C, P, L1 connect the concave line.
To make the slope of the shoulder, from point S1 down set aside 2.5 cm, point C2, which connect the L1 point, continue the line to the right by 1 cm and place the point C3. Then from point G1 up put 8cm – point P1, the angle bisector of angle – 3.5 cm point P2, a concave guide the line through the points C3, G1, G2, G3.
The design of the hem on the back from point D1 to the right on a horizontal line set aside 3 cm (point D2) and connect it with the point G3 in a straight line.
Shelf
From a point G2 to the right set aside 1/3 of TDG plus 7 cm and place the point G4: Г2Г4=48:3+7=23 see Through the point G4 and draw a vertical straight line and mark the points C4, D4,
Neck
From the point S4 to the left set aside 1/3 posh plus 1 cm, point C5:С4С5=19:3+1=7, see To determine the depth of the neck is necessary from the point C down to postpone the posh, plus 1.5 cm (point S6)= 19:3+1,5=7.5 cm, the Slit strips is 30 cm distance move from point R down. Points C6 and C5 connect and divide in half (point b). From point b draw a straight to the point B2 is equal to 1, see Point C6, B2, C5 connect the concave curve line. The design of the shoulder line. From point C3 down set aside 3 cm and set point C7, connect the dots straight and continue it. Then from the point C7 to the left put 1 cm (point C8).Shoulder width front and back are the same.
For the formation of the bottom of the shirt is aside from the point D1 to the left 3 inches and connect it to the G3 point.
Sleeve
To begin, draw a right angle with the point P in its top. For the length of the sleeve move from point R down a previously taken measure of a sleeve (60 cm) and mark the point D. From this point to the left, draw a horizontal line (line the bottom of the sleeve).
To draw the height of the top part of the sleeve, it is necessary from the point G down to postpone the TDG minus 1.5 cm (point G:RG=48:4-1,5=10.5 cm). From the point lifts the left sleeve, draw a horizontal line. To draw the width of the sleeves the top, aside from the point G to the left half the width of the armhole of the shirt plus 1 cm, the point G1: ГГ1=16,5+8,25+1=25,75 cm For the width of the bottom of the sleeve, from point D to the left put 20 cm, the point D1.
For the design of the crown use the auxiliary point. From the point G to the left put 6 cm (point P1). Then divide the width of the sleeve in half (ГГ1), check point G2, which put up an amount equal to the distance RG minus 3.5 cm, point TO Г2К=10,5-3,5=7 cm.
Then from a point G2 on the bisector of the angle set aside 5.5 cm, the point K1, the point R, K, K1, G1 connect a curved line is the top part of the rear half of the sleeves.
For registration line the front half of the sleeve must point To down to postpone 1.5 cm (point K2), K1 from a point on the bisector of an angle is 3.5 cm, the point K3, then the points P, K2, K3, G1 connect curve.
Mandarin collar

Draw a right angle with the vertex at point L.
the length of the collar. From point L to the left put a beveled scoop of posh (19 cm) plus 1 cm (point L1): LL1=19+1=20 cm.
To determine the width of the rack from point L spend the perpendicular, put it at 3.5 cm, the point L2, left from it at a right angle, draw a horizontal line of arbitrary length. Then from the point L2 set aside 1.5 cm (point L3).
To design stand-up collar, from point L down put 0.5 cm, the point N, which connect with the point L1, slightly convex curve. Then from the point A2 down put 0.5 cm and the point H1, and connect it to the L4 point line parallel lines Л1Н. Then from the point L1 up put 1.25 cm, point D2, from which the left aside of 2.75 cm, the point H3, then point L4, H3 and L1 connect. Points L4 and H3 connect curve.
The construction of the pattern turn-down collar.
Cross out a right angle with the apex At the point In
the length of the collar. From a point In the left-delayed posh plus 10-12 cm to the depth of the neck and put the point B1: BB1=18+12=30 cm
Notch. Point-up delay of 4 cm and put the point B2, which is connected direct with the point B1, divide this line in half and the middle denoted by the point B3. From a point B3 at a right angle to the line В1В2 delay of 0.5 cm and put the point B4. Points B1, B4 and B2 connected (line of neck).
The width of the collar. From point B2 up delay 9 cm and put the point B5, which is up delay of 3 cm and put the point B6. From point B6 to the left draw a horizontal line equal to the length of BB1 minus 3 cm and put the point Q7: В6В7=30-3=27 cm
The points B1, B7 and B5 combine with straight lines.
Direct В7В5 divide in half, and mid denote the point B8, which is down at right angles to the line В7В5 set aside 1.5 cm and set point B9.
Points B7, B9 and B5 combine. A straight line В1В7 divide in half, and the middle denotes the point B10, which is to the right at a right angle to the line В7В1 put 4 cm and put the point A11. Point V7. B11 and B1 connected. The collar cut out without seam. Equity the thread passes through В2В5.
Cutting and sewing shirts
Cut the main parts (seat-back panels and sleeves) make the common thread. In the cell, the upper and lower straps share thread running along their length. Cut out a shirt without seam. The slit for the zipper doing the embroidery, retreating by 0.5 cm to the left of the seam; leave 2.5 cm to the processing section. The cut length is equal to 28-30 cm
For processing the right side of the section cut out of the equity strip of a length equal to the length of the incision plus 1 cm; strip width of 7 cm, including 1 cm set aside on the seams on both sides and 2 cm on the bar to sew on buttons. For processing the left side of the neckline cut out an equity strip length with split +1 cm; the width of the strips is equal to 9 cm, including 1 cm set aside on the seams on both sides and 4 cm on the bar for loops.
Cut a strip prostrachivajut face to the right side of the incision, prostrachivajut, folded inside out, cut edge bends 0.5 cm and prostrachivajut. The second cut strip prostrachivajut to the front side of the neckline, sew around the edge of the embroidery, folded inside out, measure 4 cm and bends to 2 cm, to grind off the hinges, the edge of the slice bends 0.5 cm and prostrachivajut.
At the end of the cut, make lateral undercut length of 2 cm to the right side to form the folds, which lay from left to right and scribbled on the front side of the cut until the end of the embroidery. Lower right and left strips on the back of it at the end of the cut bends 0.5 cm and sew. On the front side on the edge of the embroidery sew bottom bar.
After processing clasp smatyvay shoulder seams-side panels, with the release of the shoulder cut back into 0.75 cm and sew from the wrong side.
The collar stand sew the face to the underside of the shirt, aligning the middle of the undercollar to the middle of the back, and prostrachivajut at a distance of 0.5 from the edge. Then the collar is folded on the front side, sew, stitch and closing prostrachivajut from the front side along the edge of the embroidery.
The side sections and sleeves smachivaetsya and stapled. The bottom of the sleeve from the edge of the embroidery folded inside out, covering the embroidery with the wrong side and sew. Sew sleeve in armhole, aligning middle sleeve with shoulder seam of your shirt and sew. The bottom of the shirt hem.
Tips on embroidery
Before the men's shirts you need to start to embroider from the bottom up, so the pattern ended logical. The sleeves and collar, embroidered with corners to the center. If the blade is thin, it is better not to do transitions on the empty cells below banners do not show through. If the shirt is made of natural fabric, the latter is dekotirovalis (washed in warm water) so that after washing the shirt, not the village.
|
