Feature 59 (figure on the right) 
Dress is made of cotton fabric or artificial silk, cut to make a soft, short-sleeve (sizes 46 - 52), cut at the waist with a wide belt.
The neck ends with the undercut on the shoulder, in which the inserted strap.
Instead of the tuck closer to the sleeve Primorka.
The back is decorated in the same way as before.
Skirt Assembly in wedges or flared "full sun" with the Assembly.
The dress is good to wear with a starched petticoat.
A dress of this style it is recommended slim women.
Drawing style lines on the pattern (Fig. 202)
Cut designed the pattern drawing tselnokrajnimi bodice with short sleeve. designed the pattern drawing tselnokrajnimi bodice with short sleeve.
Back (Fig. 202, a). Rostock to expand at the shoulder cut at 10 cm From Rostock in the middle of the back upward to postpone 1 cm down 3 cm For the design of the neckline and straps 1 point, 10 to connect a smooth line. From point 3 draw a line parallel to and equal in length to the top. A side cut from the armhole to the waist line to divide into three parts, from the lower point of division draw a line to the middle of the back, parallel to the waist line. In the middle of the back waist line to inflate by 1 cm Point 1 to connect with a side cut. Waist line to lengthen 2 cm Sleeve to shorten by 4 cm
Shelf (Fig. 202, b). To expand the neck at the shoulder cut at 10 cm From the depth of the neck up to postpone 1 cm down 3 cm to Draw the neckline and placket as well as on the back.
A side cut from the armhole to the waist to split into three parts. From the lower points of division draw a line to the middle of the shelves. In the middle of the shelves waist line to inflate 2 cm Point 2 to connect with a side cut. Shelf from waist line to lengthen 2 cm Sleeve to shorten by 4 cm
pattern pieces are numbered and show the direction of the grain lines.
Obtaining the modified pattern and cutting (Fig. 203)
For applying the pattern lines to cut. 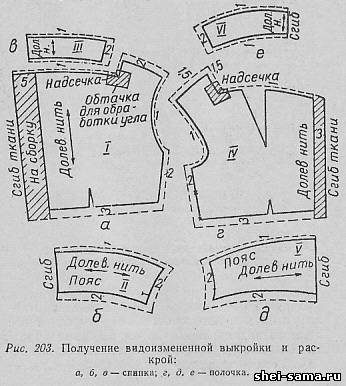
The backrest (Fig. 203, a, b, C). The middle of the backrest (item 1) to form an Assembly to move away from the fold of the fabric 5 cm At the waist (part 2) traveling tuck to close. The middle of the pattern belt to put the fold of the fabric. For the strap (item 3) to find the pattern in two parts.
The shelf (Fig. 203, g, d, e). The middle shelf (item 4) to form an Assembly to move away from the fold of fabric 3 cm Belt (item 5) to carve out the pattern with a closed pulley-block with a dart. On the strap (detail 6) shoulder tuck to close. To carve out two parts.
The skirt consists of straight panels, assembled in an Assembly at the waist. The fabric on this skirt requires 3 to 4 cloth. Length of each piece of cloth equal to the length of the skirt is made plus 6 - 7. this style can be cut the skirt in wedges.
The seam shown in Fig. 203.
Tailoring
1. To celebrate the middle of the back and forepart cushioning seam.
2. To lay a snare for the main lines and shaped patterns.
3. Fold up the bottom bar with the top, right side inside, and sew upper edge, turn out, straighten the seam, priotity.
4. Baste and sew the shoulder seams to press to the back.
5. Processing podkralas the facing angles to vrachevanie strap on the back shelf. To make nadziejko in the corner, facing the bend towards the inside, priotity.
6. The neckline shelves and back to collect the Assembly, having them by the end of podraza. To attach the top strap of the front side to the front side of the neck, equalizing sections, tack, pritchet, bend towards the inside. Tack the ends of the transfer bars weld to the undercut shoulder, pritchet. Cut the bottom strap to hem the seam of the top strap primaqiune manual stitches.
7. Baste and sew the side seams of the bodice, back and waist. To handle the seams on the wrong side, on the bodice sautieva to the side of the shelf, the belt ratatuia.
8. Pave diamond double rare place on the lower cut of the bodice: first line 0.5 cm below from the snare, the second 0.7 - 1 cm from the first. To form the Assembly,pulling the lower thread.
9. The upper section of the belt to bend towards the inside in the width of the seam allowance given in the pattern cutting, to prometti, priotity, to impose on the bodice, aligning the snare, tack and pritchet inner seam from the inside or lay the finishing line on the front side width 1 - 1.5 cm from the fold.
10. Sew all the cloth skirts, resuturing seams, pulley-block slice of the skirt to lay a double line rare. To make the Assembly, pulling the lower thread to the width of the line terminations of the skirt to the bodice.
11. Tack the bodice to the skirt, pritchet, vacate lock "lightning" in the left side seam.
12. Processing podkralas armhole with a facing width of 3 - 4 cm
13. Hem the bottom of the skirt concealed stitches.
| 