Dress  from solid-color fabric, polka dot or printed (sizes 46 - 54). With an open neckline and draping on the neck, through which weed out the bake of fabric finishing. Below the chest line instead of Darts laid soft folds. Skirt shesterova. Every seam of the inserted flared wedges that make the skirt puffier and more colorful. Sleeve one-piece, short. from solid-color fabric, polka dot or printed (sizes 46 - 54). With an open neckline and draping on the neck, through which weed out the bake of fabric finishing. Below the chest line instead of Darts laid soft folds. Skirt shesterova. Every seam of the inserted flared wedges that make the skirt puffier and more colorful. Sleeve one-piece, short.
To the dress worn by Figaro (see Fig. 282, a), made of the same fabric as the dress, or finishing, matching color with the dress.
A dress of this style it is recommended that women of high growth. For fat women flared gussets you can not do, and for lean it is recommended to add the flared wedges on the sides.
Drawing style lines on the pattern (Fig. 283)
the Style developed in, the pattern drawing tselnokrajnimi bodice with short sleeve.
The rear panel (Fig. 283, a). On waist line from center back to the left to defer 1.5 cm in the Middle of the back from the depths of the sprout to the waist line to divide it into three parts and the point 1.5 to connect with the upper point of division. To raskleit skirt hem from the middle of the back panel and side cut 6 - 8 see Point 1.5 in the waist line to connect with a point 6 - 8 at the bottom line. A lateral slice from the depth of the cut of the armholes to the waist line to divide in half and from half up to postpone 1 cm. From point 1 draw a line to the intersection with the middle of the back. To receive the flared wedges to continue the line of the Darts to the bottom.Wedges bottom line for oblique slices to be reduced by 1 - 1,5 cm width of the neck of the height of the sprout at the shoulder and cut in the middle of the back to increase by 6 - 8 cm (optional). To make the cut sprout a smooth line.
The front panel (Fig. 283, b). The width of the neck at the shoulder slice to increase by 6 - 8 cm and depth 10 - 12 cm. plotting points to connect the auxiliary line. Held the line to split in half and the dividing point delay down to 5 cm. Draw the neckline, connect the dots 6 - 8, 5, 10 - 12. On the side cut from the waist line up to postpone the cut, equal cut, applied cut on the side of the back, and draw a line to the intersection with the middle of the front. From the point of intersection delay down to 1.5 cm and draw waist line as shown in Fig. 283, b.For moving the side Darts into the neck connecting the end tuck point 5.
For rasciesa the bottom of the skirt from the side cut to the left to defer 6 - 8 cm from point to connect with the line of the hips. To flared gussets continue the line of the Darts to the bottom and oblique slices to shorten the length of the wedge by 1 - 1.5 cm
pattern pieces are numbered and show the direction of the grain lines.
Wedge (Fig. 283, b). The length of the wedge is equal to the length of the skirt from the waist line to the bottom. From point A draw a line equal to the length of the skirt, i.e., 75 cm, and put the H-point. From the received point to the right and to the left to defer half of the width of the wedge, i.e., 21 cm, then connect the width of the wedge with the point A. At the oblique slices of the wedge to delay period equal to an, and make a bottom line is a smooth line.

Obtaining the modified pattern and cutting (Fig. 284)
Back (Fig. 284, a). The middle of the pattern to put at the bend in the fabric, raise the seams on the bottom to give a 4 - 5 cm To get the Assembly on the lower cut backless side cut to carve out in a straight line.
Wedges (Fig. 284, b, C) to carve out so that the lobe thread passed through the middle of each wedge. If you allow the width of the fabric, the wedges from the hip line to the hem, you can raskleit more.
Shelf (Fig. 284, g). To obtain the draping in the neck from the middle of the neckline to do the undercut to the end of the side tuck. Tuck closed, whereby opening of the new dart in the neck. To increase priborki to take the side of it to the left 5 - 6 cm incision lines draping for valve to give allowance for the width of the finishing bakey, i.e. 3 cm, plus 5 cm for processing. The middle of the pattern is put to the bend of the fabric. Side cut shelves to find also in a straight line to increase the depth of the folds.
Wedges to the front panel of a dress (Fig. 284, d, e) to carve out the same as to the rear, only the middle of the shim (5) put the fold of the fabric and cut out one wedge and two side (detail 6).
Bake (Fig. 284, g) carve out from finishing the fabric in the shape of the neck. To do this, fold the pattern back, with shelf, aligning shoulder seams and Rostock with the neck. The width of the borders 3 cm plus 0.7 - 1 cm for grinding. To carve out with a seam or without a seam in the middle of the back two.
Bow (Fig. 284, h) can be sew-on or one-piece together with bake. Flatback bow width 6 cm, length 25 - 30 cm
Allowance for seams and supplies shown in Fig. 284.

Sewing the dress
1. To celebrate the middle of all the details and the waist on wedges cushioning seam.
2. Baste and sew the shoulder and side seams shelves and back, handle seams from the inside.
3. To lay the folds, or prioraty the bodice at the waist line.
4. Treating the neck and valves pokrainini obrazkami.
5. To prepare the binding from the finishing of cloth, folding the bottom and top part inside out, sweep and oblachat from all sides, leaving nezastroennoe 2 - 3 cm to Turn the bake on the front side, prometall and priotity. The bake can be Tacana in the neck with a facing for the treatment of the neck. In this case, the prepared bake to attach the front side to the front side of the bodice, and equating sections of the borders with the cut of the neck, from above to put obtachku for treatment of the neck, sew all 4 of the cut seam width 0.7 cm (by bending the flaps for draping).Obtachku to bend towards the inside and sew hidden stitches manually.
6. If the binding is attached separately, the first drape is placed on the valve, and then attach finishing bake concealed stitches to the skin of the neck. The sections of the valve from the inside to attach manually to the facing of the neck.
7. Processing podkralas the armhole facing.
8. Sweep wedges skirt from the upper edge to the waist and from the waist line down to votati flared wedges. Sew the wedges to handle the seams on the wrong side and press their front and side to the middle of the front, back to the middle of the back.
9. Hem the bottom of the skirt, ironed dress.
Drawing style lines on the Figaro pattern (Fig. 285)
Style 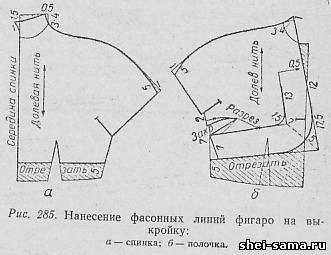 developed on the pattern drawing tselnokrajnimi bodice with attached short sleeve and gusset. developed on the pattern drawing tselnokrajnimi bodice with attached short sleeve and gusset.
Back (Fig. 285, a). To build tselnokrajnie rack. To do this, the height of the sprout up to postpone the height of the stand, T., E. 3 - 4 cm From the left point to draw a line of arbitrary length, then the middle of the back to continue up to the intersection with the first line from the intersection point delay down 1 cm the stand height (points 3 to 4) to the left in a straight line to delay 0.5 cm, connecting point 0,5 point 1, continuing to the right the line 1 cm Draw a concave line stance. The length of the back side cut for Figaro to shorten 5 cm (optional).
Shelf (Fig. 285, b). To build the rack. For this shoulder cut continue right to the stand height of the backrest, ie 3 - 4cm, and up at a right angle to postpone 1 see Connect point 1 smooth line from the top of the neck. From the depth of the neck down to postpone 12 see Points 1, 12 connect, prodali line on the 17.5 cm side cut to shorten Figaro 5 cm and connect to point 5 with point of 17.5. The angle at the point of 17.5 split in half and draw a line length of 5 cm, then a smooth line to draw the lower part of Figaro. The remainder of tackle Darts to move to the side cut off.The width of the facing belt shelves in side cut 7 cm From a point 5 continue the line at 7 cm, connecting point 7 and the width of the belt, continuing the line upward and toward the middle of the shelves, as shown in Fig. 285. The angle from points 7 to divide in half and continue the line for a 1.5 cm Round the corner of Figaro, as shown in the figure. For the formation of the second soft tuck side tuck to move to the undercut. For razrezku on the bottom of the sleeve to cut off 1 cm on the front and the back.
Obtaining the modified pattern and the cut Figaro (Fig. 286)
Back (Fig. 286, a) 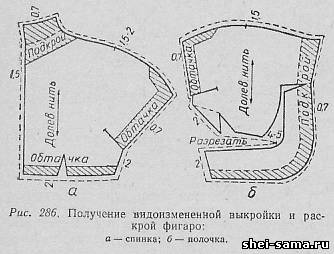 can be cut with seam and without seam in the middle. To handle stand to make podkraj, the width of which is equal to the width of the rack plus 3 - 4 see can be cut with seam and without seam in the middle. To handle stand to make podkraj, the width of which is equal to the width of the rack plus 3 - 4 see
the seam shown in the picture touches.
The shelf (Fig. 286, b). On the put line from the side cut to do the undercut, not dorezaya 0.5 cm to the middle of the shelves, take the pattern to the soft folds at 4 to 5 cm lateral move tuck to do the undercut to the end of it, not dorezaya 0.5 cm, close the tuck, thereby opening up new tuck in the undercut.
To stand to make podkraj together with the lower part of Figaro.
Tailoring of Figaro
1. To celebrate the middle of the back (no seam) and the middle shelves cushioning seam.
2. To lay a snare for the main lines and shaped patterns.
3. Lay pleats in relief, folded belt with the shelf facing inward and sew from the wrong side, zastraivaya at the same time the crease at the end of podraza 2 - 3 cm.
4. To handle a loop with one or two obrazkami.
5. Baste and sew the middle of the back, if it was in the joint, and also shoulder and side seams shelves and back.
6. To votate and vacate gusset.
7. Processing rack podkralas the facing, the facing pritchina simultaneously for the treatment of NCDs.
8. To handle the lower section of sleeve cross facing, processing simultaneously razrezki at the top of the sleeve.
9. Hem hem concealed stitches.
|
