The upcoming trip to the lake and the lack of winter pants with bib from my daughter prompted me to make this Romper for her. I liked the fact that I could make them very inexpensively from a pair of adult nylon pants and they protected from getting wet in the snow. My daughter was warm and comfortable, and we had fun. Here's how I did it.
Materials:
1. Fabric nylon waterproof: 1 m
• I actually made mens nylon pants size XL that I bought in the store. But if you want, you can buy fabric.
2. Lining fabric (cotton): 25 x 25 cm
• You can use almost any fabric here because it is not visible, it doesn't touch the baby's skin, so use whatever you have on hand. I used the cotton.
3. Wide elastic band (3 cm or more wide): 1 m
• I used a rubber dot that was in my inventory, but you can use any rubber band that you have on hand, like the kind used in the belt of children's pants.
4. A narrow band (0.6 to 1 cm in width) : 50 cm
Test fabric: highly recommended
Run it under water in the sink and check whether the fabric is wet after removing the water. If Yes, then is not suitable for outerwear in the snow. The main objective of this clothing is to protect the skin from getting wet and if the fabric is not waterproof, it will be useless. So spare yourself from frustration. The ideal fabric when the water is draining from her, making her wet.
Tailoring:
These winter waterproof pants based on the Romperthat I made earlier. If any step is not very clear, I highly recommend to watch the lesson tailoring of overalls here.
Sew pants:
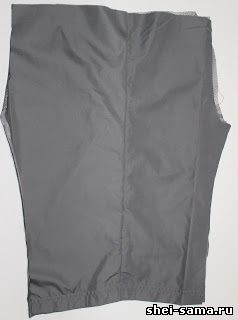
1. To use a simple pattern of pants that you have to sew these pants. Keep in mind while cutting these pants:
• Make sure that you have added several inches to the width (each side) because you need these pants to wear several layers of pants.
• Remove any means for the belt because we are going to sew the belt separately.
• If you are doing it from the other pants, make sure they match the pants with the original hem. That would save You time and do not hem them again.
2. Sew the pants as sew any basic pants.
Pants ready, set them aside while we work on the yoke and waistband.
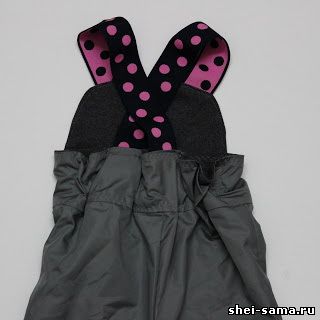
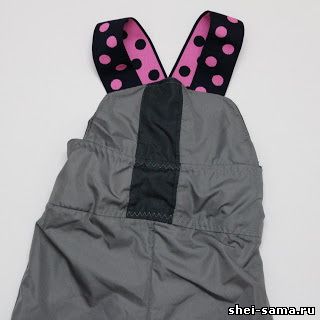
3.
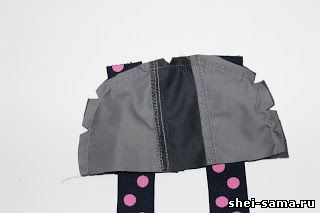
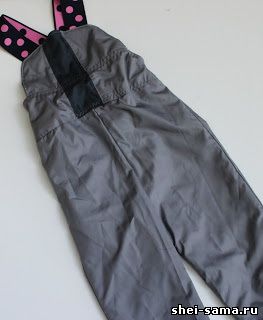
Cut a semi-circle with an 18 cm base out of nylon. Cut another semi-circle from the lining fabric. Cut the bodice into two parts. Put fabric right sides together and put the elastic between the two layers. Place the rubber band so that the distance from each other in the upper part of the semicircle was about 5 cm to Sew a seam along the round part, making sure you catch all layers, and the ends of the bands. Make cuts in the fabric along the seam.
The design of the belt:
4. Measure your waist around the top of the pants. Let's call this length. cut two pieces the length Of+2.5 cm and width 7.5 cm, One made of waterproof fabric (outer shell), one cotton (lining).
5. Sew each piece along the 7.5 cm side. You got two rings is equal to the circumference of the waist. Fold these rings, right sides together.

Insert bib with rubber bands between the rings. Make sure that the lining fabric matches the lining of the belt. Sew along the edge of the part where the bib.
6.
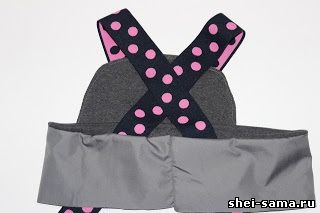
Now decide what length you want your elastics, and where they will be located on the back. I recommend cross placement for a snug fit, but you can also do them side by side. Once you have decided the length and the location, secure the elastic band between the front sides made of nylon and sew.
7.
Now, when the top is ready, sew all around the waist and make sure that the center of the breastplate coincides with the center of the pants.
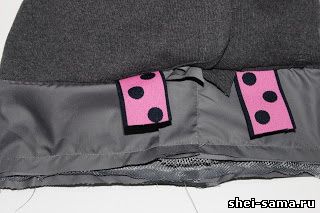
8.
Leave the belt holes 4 cm for the elastic.
9.
Insert elastic, using the blanks that you left in step 8. Sew the elastic on both sides, reinforce with a few stitches. Holes to sew up.
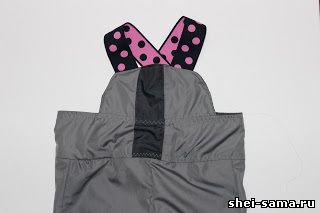
10.
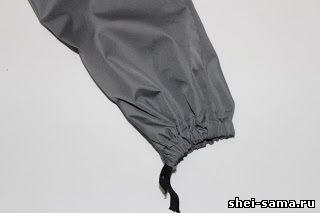
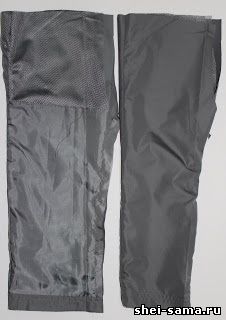
If You used the original hem of the pants, you can use the existing foot rails for the rubber bands. Make a cut in the seam and insert elastic. Pull it so that the cuff is comfortable sitting on the leg of the child. Now sew the hole.
If you made pants from fabric, fold it once 0.6 cm, and then fold over another 2 cm to make the cavity. Sew leaving a hole under the rubber band. Now insert a narrow elastic band in the cavity. Sew both ends of elastic together and sew the hole. To do it on the other leg too.
11.
Ready! What are you waiting for? Go play in the snow!
Notes: You need a suit to pry warm pants, because it is not insulated. Jumpsuit great job of protecting your baby from any dampness. If you want to make a winter jacket, you need between the waterproof fabric and lining to add a layer of warm fabric.
| 